Last Updated on July 14, 2024 by Vinson Lozano
Understanding the Basics of Bicycle Goatlink 101
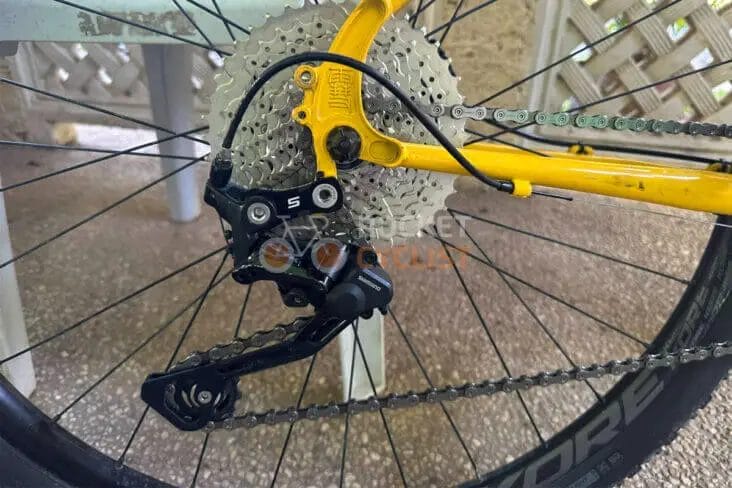
Introduction to Goatlink Technology
Transitioning from understanding the basics of bicycle components, Goatlink technology is a true game-changer in the world of cycling.
Goatlink is a small yet innovative device designed to improve the performance of your bike’s drivetrain.
Why Goatlink?
- Effortlessly smooth gear shifting
- Enhanced chain management
- Extended compatibility with various drivetrains
By optimizing the derailleur hanger geometry, Goatlink allows for precise gear changes, reducing frustration and improving your riding experience. With this simple addition, you’ll notice a significant difference in performance.
Benefits of Using a Goatlink for Smoother Shifting
Building on the advantages of Goatlink technology, let’s delve into how it enhances gear shifting.
Key Benefits:
- Improved Gear Precision: Eliminate misshifts and enjoy fluid transitions.
- Reduced Chain Tension: Less strain on your drivetrain, resulting in longevity.
- Minimized Noise: Quieter rides with reduced chain slap.
With Goatlink, every shift feels more responsive and accurate, helping you maintain momentum and focus on enjoying your ride. It’s a small upgrade with a big impact on your cycling experience.
Compatibility and Installation of Goatlink

Bicycle Drivetrain Compatibility with Goatlink
Continuing from the benefits of smoother shifting, let’s explore Goatlink’s compatibility with various drivetrains.
Compatibility Highlights:
- Wide Range: Works with most 10, 11, and 12-speed drivetrains.
- Brands Supported: Compatible with Shimano, SRAM, and other major brands.
- Versatility: Adaptable to different bike models and frame designs.
By ensuring broad compatibility, Goatlink makes upgrading your bike easy. Just verify your drivetrain specifications and install confidently to experience enhanced performance.
Step-by-Step Installation Guide for Goatlink on Your Bike
After understanding Goatlink’s compatibility, it’s time to install it with ease.
Installation Steps:
- Tools Needed: Allen wrench, screwdriver, and a bike stand.
- Detach the Derailleur: Use the Allen wrench to remove the derailleur.
- Attach the Goatlink: Connect Goatlink to the derailleur hanger.
- Reattach the Derailleur: Secure the derailleur back onto Goatlink.
- Fine-Tune: Adjust the gears to ensure smooth shifting.
Following these steps ensures a seamless installation, transforming your ride with better performance and efficiency.
Performance Enhancement with Goatlink
Improved Gear Shifting Efficiency
Following the easy installation, you’ll immediately notice improved gear shifting efficiency.
Efficiency Benefits:
- Responsive Shifts: Quicker and more precise gear changes.
- Reduced Wear: Less strain on your drivetrain components.
- Better Energy Use: Optimal power transfer for smoother rides.
Enhanced gear shifting efficiency means you’ll expend less energy during transitions, allowing you to focus on speed and control. Goatlink effectively optimizes the entire shifting process, making your rides more enjoyable and efficient.
Reduced Chain Slap and Noise During Gear Changes
Building on improved shifting efficiency, Goatlink also reduces chain slap and noise during gear changes.
Noise Reduction Benefits:
- Quieter Rides: Minimize distracting chain clatter.
- Enhanced Stability: Reduced chain bounce for smoother biking.
- Better Chain Alignment: Maintains proper chain tension and alignment.
With Goatlink, every shift feels seamless and hushed. This creates a more pleasant riding experience, helping you stay focused and enjoy the serene moments of your ride without the annoying distractions of chain noise.
Maintenance and Care Tips for Goatlink
Proper Cleaning and Lubrication of Goatlink
Transitioning from noise reduction, maintaining your Goatlink is essential for optimal performance.
Cleaning Tips:
- Gentle Cleaning: Use a soft brush and mild cleaner to remove dirt.
- Avoid Harsh Chemicals: Prevent potential damage by sticking to bike-specific products.
Lubrication Advice:
- Selective Lubrication: Only lubricate pivot points to ensure smooth movement.
- Regular Maintenance: Perform lubrication every few weeks or after muddy rides.
Consistent cleaning and proper lubrication keep your Goatlink functioning flawlessly, extending its lifespan and ensuring your rides remain smooth and efficient.
Inspection and Troubleshooting Common Goatlink Issues
After mastering cleaning and lubrication, it’s vital to inspect and troubleshoot your Goatlink regularly.
Inspection Steps:
- Visual Check: Examine for any visible wear or damage.
- Test Shifting: Ensure smooth and precise gear changes.
Troubleshooting Tips:
- Misalignment: Adjust the Goatlink if shifts feel imprecise.
- Loose Screws: Tighten any loose components to maintain stability.
By regularly inspecting and addressing issues promptly, you’ll maintain optimal functionality. A well-maintained Goatlink means fewer disruptions, ensuring every ride is as smooth and enjoyable as possible.
Advantages of Upgrading to Goatlink
Enhanced Overall Performance of Your Bike
Building on regular inspections, upgrading to Goatlink can significantly enhance your bike’s overall performance.
Performance Boosts:
- Optimal Shifting: Experience flawless and responsive gear changes.
- Increased Efficiency: Maximize power transfer with reduced friction.
- Extended Component Life: Reducing wear ensures longevity of your drivetrain parts.
By incorporating Goatlink, your bike becomes more reliable and enjoyable to ride. This small investment in technology leads to a substantial improvement in everyday performance, letting you focus on conquering the trail or road ahead.
Extended Lifespan of Your Drivetrain Components
Following enhanced overall performance, Goatlink also extends the lifespan of your drivetrain components.
Longevity Benefits:
- Reduced Wear: Minimizes friction and strain on gears and chains.
- Consistent Performance: Decreases the frequency of part replacements.
- Cost-Effective: Saves money in the long run by protecting expensive components.
By implementing Goatlink, you ensure that your bike’s drivetrain remains in top condition for longer. This not only preserves performance but also provides peace of mind knowing your investment is well-protected and durable.
Conclusion and Recommendations
Final Thoughts on the Benefits of Bicycle Goatlink 101
Wrapping up on drivetrain longevity, let’s reflect on the overall benefits of using a Goatlink.
Key Takeaways:
- Enhanced Shifting: Smoother, quicker, and more precise gear changes.
- Noise Reduction: Quieter rides with minimal chain slap.
- Improved Durability: Extends the lifespan of drivetrain components.
Implementing Goatlink transforms your biking experience, making every ride more enjoyable and efficient. From reducing noise to enhancing performance, it’s a small upgrade with a significant impact. Consider adding Goatlink to your bike for a seamless and enhanced cycling journey.
Tips for Optimizing Your Gear Shifting with a Goatlink
Concluding the benefits, here are some tips to optimize your gear shifting with Goatlink.
Optimization Tips:
- Regular Maintenance: Keep the Goatlink clean and lubricated.
- Proper Adjustment: Ensure the Goatlink is correctly aligned with the derailleur.
- Consistent Inspections: Frequently check for any wear or loose components.
Riding Techniques:
- Smooth Shifts: Anticipate terrain changes and shift before climbing or descending.
- Avoid Cross-Chaining: Prevent extreme angles to reduce stress on the drivetrain.
By following these tips, you’ll maximize the benefits of Goatlink, ensuring smoother, more efficient shifts and prolonging the life of your bike’s components.

