Last Updated on December 31, 2023 by Vinson Lozano

Do you love riding your bicycle but hate taking it to the bike store for maintenance? If yes, then DIY bicycle service is a great alternative for you. In this blog, we will discuss the benefits of DIY bicycle service and why it is a great choice for all cycling enthusiasts.
Why DIY bicycle service is beneficial
DIY bicycle service means maintaining your bike yourself instead of taking it to a professional. It might sound like a daunting task, but it has several benefits. Firstly, it saves you money since you don’t have to pay for labor costs and unnecessary repairs. Secondly, you have complete control over the repairs and can personalize the service according to your preferences. Thirdly, it’s a great learning experience that enhances your mechanical knowledge and confidence.
Benefits of servicing your bike at home
When you service your bike at home, you have the advantage of not having to wait for your turn at a bike repair shop. You can service your bike whenever you want without any appointments. Moreover, you can clean your bike more frequently, which is crucial for maintaining the longevity of your bike. You can also personalize the service by using specific tools and parts of your preference. Lastly, you can save time since you don’t have to travel to and from the bike store.
In conclusion, DIY bicycle service is a great choice for all cycling enthusiasts. It saves money, enhances your mechanical knowledge, gives you more personalization options while maintaining your bike’s longevity. Try it out, and you won’t be disappointed.
Essential Tools for DIY Bicycle Service
Must-have tools for servicing your bike
To effectively service your bike, there are several tools you need to have in your arsenal. These include:
- Set of Allen keys (sizes 3-8mm)
- Screwdrivers (Phillips and flathead)
- Adjustable wrench
- Tire levers
- Pump
- Chain tool
- Lube
- Cleaning brushes
These tools will enable you to carry out basic repairs like fixing a flat tire, adjusting brakes, and gears.
Optional tools to enhance your bike service experience
While the above tools are essential, you can enhance your DIY bike service experience with the following optional tools:
| Tool | Purpose | ||||||||
|---|---|---|---|---|---|---|---|---|---|
| Bike stand | Keeps your bike upright and offers stability when repairing | Torx keys | Fits the star-shaped bolts used on some components like brake rotors and disc brakes | Chain wear indicator | Measures the wear of your bike chain. | Bottom bracket tool | Screws and unscrews the bottom bracket cups for bearing maintenance | Cassette tool | Loosens the lockring holding the cassette in place |
Having these tools in your kit will make complicated repairs more manageable. With both must-have and optional tools at your disposal, you can service your bike like a pro and save some money while you’re at it.
Preparing Your Workspace
Setting up a dedicated workspace
Before you start working on your bike, it’s important to set up a dedicated workspace. This will help you stay organized and make the process much easier. Find a clean, well-lit area where you can comfortably work on your bike.
Make sure that your workspace is flat and level. You don’t want to work on a sloped surface, as this can affect the accuracy of your repairs and lead to safety issues down the line.
Organizing tools and materials
Once you’ve secured your workspace, it’s time to organize your tools and materials. Keep your essential tools close by, so you can easily reach them when you need them. Consider investing in a tool chest or pegboard to help keep your tools in order.
Set up a designated area for your cleaning supplies, lubes, and any other materials you may need. This will keep everything in one place and prevent you from searching for what you need mid-repair.
By taking the time to prepare your workspace and organize your tools and materials, you’ll be able to work more efficiently and effectively on your bike. This will ultimately save you time and money in the long run.
Basic Bike Maintenance
Inspecting and cleaning the bike frame
To maintain your bike in good condition, it is important to inspect and clean your bike frame periodically. Start by wiping off any dirt and grime from the frame using a soft cloth. Inspect for any cracks, scratches or dents in the frame. If you notice any cracks or dents, it is best to take your bike to a professional to assess whether it is safe to ride.
Next, use a mild detergent and warm water to clean the bike. To avoid damaging the paint, make sure to avoid harsh chemicals or abrasive materials. Use a soft brush to scrub the frame and a clean cloth to dry it off. If the bike is particularly dirty, consider using a degreaser or bike-specific cleaning products.
Checking and adjusting tire pressure
Another important aspect of bike maintenance is regularly checking and adjusting the tire pressure. Use a tire pressure gauge to measure the pressure in your tires, and compare it to the recommended PSI (pounds per square inch) listed on the tire sidewall.
If the tire pressure is too low, use a pump to add air until it reaches the recommended PSI. If the tire pressure is too high, release air until it reaches the recommended PSI.
Correct tire pressure is important for safe and comfortable riding, as it affects the handling and stability of your bike. By regularly inspecting and adjusting your tire pressure, you’ll be able to extend the lifespan of your tires and enjoy a smoother ride.
Lubricating the Bike Chain
Importance of bike chain lubrication
Maintaining your bike’s chain is crucial to its optimal performance. A properly lubricated chain is essential to prevent unnecessary wear and tear on the drivetrain. It also helps to provide you with a smooth and comfortable ride. Applying lubricant to the chain keeps it free from dirt, dust, and grit buildup which can prolong the chain’s lifespan.
Step-by-step guide to lubricating your bike chain
- Start by cleaning the bike chain using a degreaser and a chain cleaner tool.
- Rinse it with water and let it dry completely.
- Apply a drop of lube to every link of the chain using a syringe or an applicator brush.
- Rotate the pedals backwards to distribute the lubricant evenly.
- Wipe off any excess lubricant to prevent attracting dirt and debris.
- Let the lubricant set for several hours before riding on your bike.
Remember to lubricate your chain regularly, especially after riding in wet or dirty conditions. Check your chain frequently for any signs of wear and replace it as necessary. By following these simple steps, you can ensure that your bike chain stays in good condition and you can enjoy a smooth ride every time.
Adjusting Brakes and Gears
Identifying brake and gear issues
To ensure your safety when riding a bike, it’s important to keep your brakes and gears in good condition. Before you start adjusting them, it’s important to identify any issues they may have. For brakes, listen for any squealing or rubbing sounds. Check if the brake pads are worn out or if the cables are loose. For gears, listen for any clicking or grinding sounds. Make sure the chain isn’t slipping or jumping when you shift gears.
Calibrating and adjusting brakes and gears
Once you’ve identified any issues with your brakes or gears, it’s time to calibrate and adjust them. For brakes, start by adjusting the tension on the cables. Tighten or loosen them as needed until the brake pads hit the rim evenly. For gears, use the barrel adjuster to fine-tune the shifting. Make small adjustments at a time until the chain shifts smoothly and accurately.
Remember to test your brakes and gears before riding to ensure they are working correctly. Regularly inspect them and replace any worn-out parts as necessary. Keeping your brakes and gears in good condition is vital for your safety and comfort when riding a bike.
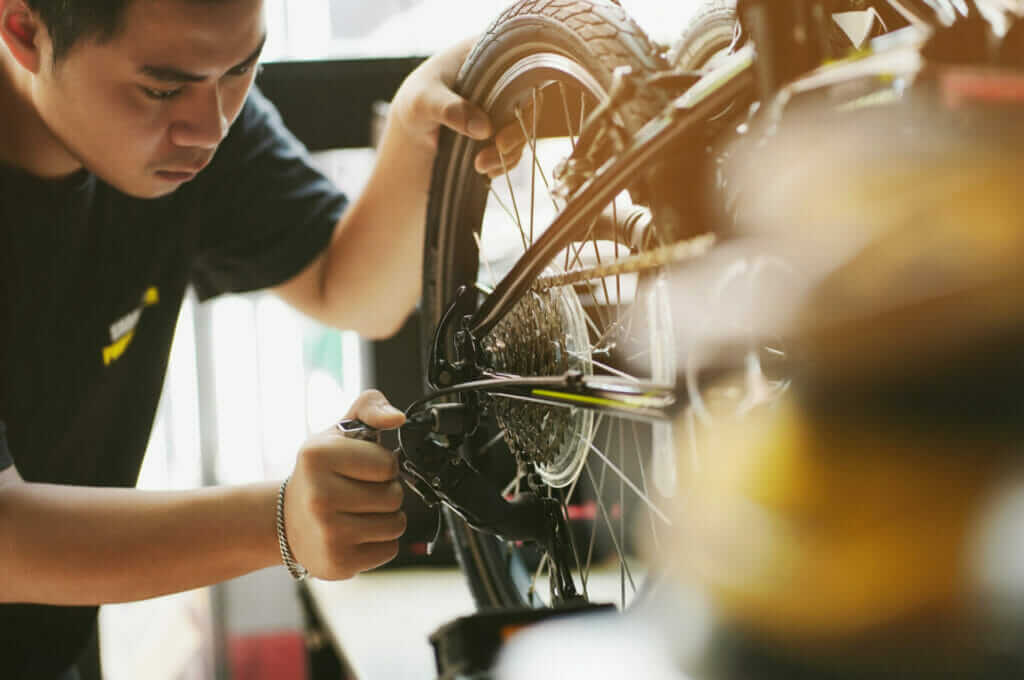
Wheel and Tire Maintenance
Checking for tire wear and damage
To ensure a smooth and safe ride, it’s important to regularly check the condition of your bike’s wheels and tires. Look for any signs of wear or damage, such as cracks, bulges, or worn-out treads. If you notice any of these issues, it’s time to replace the tire. Additionally, check the tire pressure to ensure it’s within the recommended range, which is usually printed on the sidewall of the tire.
Replacing inner tubes and fixing punctures
If you experience a flat tire while riding, it’s important to know how to replace an inner tube or fix a puncture. Start by removing the wheel and tire from the bike. Use a tire lever to carefully remove the tire from the rim. Remove the inner tube and locate the puncture. Use a patch kit or replace the tube completely. Reinstall the tire onto the rim and inflate it to the recommended pressure.
Regularly inspecting and maintaining your bike’s wheels and tires can prevent issues and ensure a safe and comfortable ride. With a little bit of effort, you can keep your bike running smoothly for many miles to come.
Cleaning and Detailing Your Bike
Choosing the right cleaning products
Before starting the cleaning process, make sure you have the right products for your bike’s specific needs. Choose a bike-specific cleaner that won’t damage the paint or components. Avoid using dish soap or other household cleaners that can strip away grease and lubrication. Additionally, get a soft brush or sponge, a microfiber towel, and a degreaser if needed for any buildup on the chain or other parts.
Step-by-step guide to cleaning and detailing your bike
- Inspect your bike for any damage or areas that need special attention. This includes the chain, brake pads, and wheels.
- Use a hose or bucket of water to rinse off any loose dirt or debris.
- Apply the bike cleaner to the frame, wheels, and other components. Use the soft brush or sponge to gently scrub away dirt and grime.
- Rinse off the cleaner with water, making sure to remove all the suds from the bike.
- Dry the bike with a microfiber towel, making sure to remove all the water from the frame, components, and wheels.
- Apply a lubricant to the chain and other components that need it. Wipe away any excess.
- Inspect your bike again to ensure it’s clean and in good condition.
Regularly cleaning your bike not only helps it look great, but also extends its lifespan and performance. With the right cleaning products and a bit of effort, you can keep your bike in top shape for years to come.
Advanced Bike Servicing
Replacing bike components
As your bike ages, it may require more than just regular cleaning and maintenance. Some components may need to be replaced after many miles of use. The most common parts that require replacement are the tires and brake pads. When replacing these components, it’s important to choose high-quality replacements that are the correct size and type for your bike. Follow the manufacturer’s instructions for installation, and test the brakes and tires before riding to ensure they are working properly.
Performing complex repairs
For more complex repairs, such as replacing a broken derailleur or fixing a bent wheel, it’s best to consult a professional bike mechanic. These types of repairs require specific tools and expertise to be done safely and correctly. Attempting to perform these repairs yourself can be dangerous, and may cause further damage to your bike. However, if you’re an experienced bike mechanic, you can buy specialized tools and learn how to fix your bike yourself. Just remember to take your time and follow proper procedures in order to avoid making the problem worse. In any case, be sure to regularly service your bike to keep it safe and in good condition.
Advanced Bike Servicing
Replacing bike components
As your bike gets older, it may need more than just routine cleaning and maintenance. Some components may have to be replaced after many miles of use. Tires and brake pads are among the components that often need replacing. When replacing these components, always choose high-quality replacements that are the proper size and type for your bike. Follow the manufacturer’s instructions for installation, and test the brakes and tires before riding to be sure they are working properly.
Performing complex repairs
For more complicated repairs like replacing a broken derailleur or fixing a bent wheel, it’s best to seek out a professional bike mechanic. These types of repairs require specific tools and expertise to be done correctly and safely. Trying to repair these issues yourself can be risky and may lead to more damage to your bike. However, if you’re an experienced bike mechanic, you can buy specialized tools and learn how to fix your bike yourself. Just remember to take your time and follow proper procedures to avoid making the problem worse. Regardless, always make sure to service your bike regularly to keep it safe and in good condition.
Conclusion
Recap of the benefits of DIY bicycle service
There are several advantages to learning how to service your bike yourself. First, it saves money on labor costs for minor repairs and maintenance. Second, it provides a more in-depth understanding of bike mechanics and how they work, which can help you diagnose problems more quickly and effectively in the future. Finally, it allows you to customize your bike to your own riding style and preferences.
Encouragement to start servicing your bike at home
Don’t be intimidated by bike servicing! With some basic knowledge and the right tools, you can perform routine maintenance and minor repairs on your own. There are countless online resources and tutorials available to help you get started. By learning how to service your bike, you’ll save money, gain valuable skills, and have a greater appreciation for your bicycle. So why not give it a try?