Last Updated on February 11, 2024 by Vinson Lozano
Learning to ride a bike is an exciting milestone for children. It not only promotes physical activity but also boosts their confidence and independence. Teaching your child to ride without training wheels is a significant step towards their growth. In this blog post, we will explore ten proven techniques to help your child learn to ride a bike on their own. These techniques range from using strider bikes and training wheels to more advanced methods such as the running start and push and glide. With a supportive and safe practice environment, your child will soon be riding confidently and independently.
Importance of learning to ride a bike independently
Learning to ride a bike independently is an important milestone for children. It promotes physical activity, improves balance and coordination, and boosts their self-confidence. By mastering this skill, children gain a sense of freedom and independence as they explore their surroundings. Riding a bike also fosters a sense of adventure and encourages outdoor play, which contributes to a healthy and active lifestyle. Moreover, it helps develop skills such as problem-solving, decision-making, and perseverance. Teaching your child to ride without training wheels opens up a world of possibilities and sets them on the path to lifelong enjoyment of cycling.
Benefits of teaching your child to ride without training wheels
Teaching your child to ride without training wheels offers several benefits. Here are some of the advantages they can experience:
- Improved balance and coordination: Riding without training wheels helps children develop their balance and coordination skills, enhancing their overall physical abilities.
- Boosted self-confidence: Successfully riding a bike without assistance boosts a child’s confidence and self-esteem, showing them that they can achieve new and challenging tasks.
- Increased independence: Riding independently gives children a sense of freedom and allows them to explore their surroundings with confidence.
- Enhanced problem-solving skills: Learning to ride without training wheels requires problem-solving skills, such as figuring out how to balance and avoid obstacles. This skill development can transfer to other areas of their lives.
- Promotion of an active and healthy lifestyle: Riding a bike is a fun and active form of exercise that encourages children to stay physically active and enjoy outdoor activities.
By teaching your child to ride without training wheels, you empower them with essential life skills and set them on a path of adventure and lifelong enjoyment of cycling.
Selecting the Right Bike and Equipment
Choosing the appropriate bike size is crucial for your child’s success in learning to ride without training wheels. Ensure that the bike is the right size, with your child able to touch the ground with both feet when seated. Additionally, provide essential safety gear such as a properly fitted helmet, knee pads, and elbow pads to protect them from potential falls. These precautions will give your child the confidence and safety they need to master riding their bike independently.
Choosing the appropriate bike size
When selecting a bike for your child, it’s crucial to choose the appropriate size. Make sure that your child can touch the ground with both feet when seated on the bike. This will give them a sense of stability and control while riding. A bike that is too big or too small can make it difficult for them to balance and maneuver. Refer to the bike manufacturer’s sizing chart to determine the right size for your child’s height and age.
Essential safety gear for your child
When teaching your child to ride a bike, it’s crucial to prioritize safety. Equip your child with the essential safety gear to ensure their protection. The necessary safety gear includes a properly fitted helmet, elbow and knee pads, and closed-toe shoes. A helmet is essential to protect their head in case of a fall or collision. Elbow and knee pads provide extra protection for their joints, while closed-toe shoes offer better grip and prevent injuries. Make sure the safety gear fits properly and is worn at all times during bike practice sessions.
Find a Safe Practice Area
When teaching your child to ride a bike, it’s important to find a safe practice area. Look for locations that are free from traffic and obstacles, such as empty parking lots, quiet residential streets, or local parks with designated cycling areas. Ensuring a safe practice area is crucial to minimize potential accidents and distractions, allowing your child to focus solely on learning to ride. Remember to always supervise them and provide guidance during their practice sessions.
Identifying suitable locations for practicing
To find a suitable practice area for teaching your child to ride a bike, look for locations that are free from traffic and obstacles. Empty parking lots, quiet residential streets, and local parks with designated cycling areas are great options. These areas provide ample space for your child to practice without the worry of cars or pedestrians. Remember to prioritize safety and choose a location where distractions are minimized, allowing your child to focus on learning to ride. Always supervise and guide them during their practice sessions.
Tips for creating a safe and supportive practice environment
- Choose a practice area that is free from traffic and obstacles. Look for empty parking lots, quiet residential streets, or local parks with designated cycling areas.
- Remove any potential hazards from the practice area, such as rocks, sticks, or debris.
- Ensure the area is well-lit if you plan to practice during the evening or early morning hours.
- Clear the area of any distractions, such as other children or pets.
- Encourage your child to wear their safety gear, including a helmet, wrist guards, and knee pads.
- Provide verbal encouragement and positive reinforcement to boost your child’s confidence.
- Always supervise and guide your child during their practice sessions.
- Stay patient and allow your child to progress at their own pace.
- Celebrate their achievements, no matter how small, to keep them motivated and excited about learning to ride.
- Ensure your child stays hydrated and takes breaks when needed.
Technique #1: Strider Bikes and Balance Bikes
Strider Bikes and Balance Bikes are great tools for teaching your child how to ride a bike independently. These bikes are designed without pedals, allowing your child to focus on their balance and coordination. By using their feet to propel themselves forward, they can gain confidence and develop their motor skills. These bikes are suitable for children as young as 18 months old and are a fun and effective way to prepare them for riding a traditional bike.
Exploring the benefits of strider and balance bikes
When it comes to teaching your child to ride a bike independently, strider and balance bikes offer a range of benefits. These bikes help your child develop their balance, coordination, and motor skills. By focusing on using their feet to propel themselves forward, they can build confidence and learn at their own pace. Strider and balance bikes are also lightweight and easy to handle, making them perfect for young riders. They provide a smooth transition from walking to riding, setting the foundation for future biking success.
Guidelines for using strider bikes effectively
When using strider bikes to teach your child to ride, here are some guidelines to ensure effectiveness:
- Proper sizing: Choose a strider bike that allows your child to comfortably reach the ground with their feet.
- Encourage balance: Encourage your child to use their feet to balance and propel themselves forward, instead of relying on the pedals.
- Gradual progression: Start on flat, smooth surfaces and gradually introduce inclines and uneven terrains as your child becomes more confident.
- Practice regularly: Set aside regular practice sessions to help your child build their balance and coordination skills.
- Provide support and encouragement: Offer positive reinforcement and support as your child learns to ride, boosting their confidence and motivation.
Technique #2: Starting with Training Wheels
Starting with training wheels is a popular method to teach children how to ride a bike. Training wheels provide stability and support, allowing children to gain confidence as they learn to balance and steer. However, it is important to gradually transition your child from training wheels to riding independently. Start by raising the training wheels slightly so your child can begin to experience the feeling of balancing. Over time, gradually lower the training wheels until they are no longer touching the ground. This technique allows your child to develop balance and coordination skills while still feeling safe and supported.
Pros and cons of using training wheels
Using training wheels can provide stability and support for your child, allowing them to gradually develop balance and coordination skills. Some advantages of using training wheels include:
- Increased confidence: Training wheels give your child the confidence to explore riding a bike without the fear of falling over.
- Safety: Training wheels help prevent accidents by keeping the bike upright and stable.
However, there are some downsides to using training wheels:
- Limited balance development: Training wheels can hinder your child from fully developing their balance skills, as they rely on the extra support.
- False sense of security: Some children may become overly dependent on training wheels and have difficulty transitioning to riding without them.
It’s important to gradually transition your child from training wheels to independent riding to ensure they develop all the necessary skills.
Gradual transition from training wheels to riding independently
When your child has gained enough confidence and balance with training wheels, it’s time to transition to riding independently. Start by raising the training wheels slightly off the ground, allowing your child to experience the feeling of balancing on their own. Gradually lower the training wheels until they are no longer touching the ground. Encourage your child to practice in open areas without relying on the training wheels for support. With consistent practice, your child will develop the necessary skills to ride a bike without training wheels.
Technique #3: The Running Start Method
To use the running start method, find a slightly sloped area. Have your child sit on the bike with their feet flat on the ground and give them a push to start them moving. As they gain speed, encourage them to lift their feet off the ground and balance on their own. This technique helps children learn the sensation of balancing while gaining momentum. It’s important to choose a safe area with plenty of space and supervise your child throughout the process.
Step-by-step guide to using the running start method
- Find a slightly sloped area with plenty of space.
- Have your child sit on the bike with their feet flat on the ground.
- Give them a gentle push to start them moving.
- Encourage them to lift their feet off the ground and balance as they gain speed.
- Provide support and encouragement throughout the process.
- Repeat the process until they feel comfortable balancing on their own.
- Gradually increase the slope to further challenge their balancing skills.
- Ensure safety precautions are in place, such as wearing helmets and pads.
Benefits and effectiveness of this technique
The running start method is an effective technique for teaching your child to ride a bike independently. By starting with a gentle push, your child learns to balance and gain confidence in their abilities. This technique allows them to gradually build their balance and coordination skills, leading to a smoother transition to riding on their own. The running start method also helps improve their overall bike control and gives them a sense of accomplishment as they become more proficient in riding without training wheels.
Technique #4: Push and Glide
The push and glide technique is an effective method to help your child learn to ride a bike. Start by pushing your child on the bike while they keep their feet off the ground. Encourage them to balance and coast for as long as possible before putting their feet down. Gradually increase the distance and speed of the push, allowing them to build confidence and improve their balance. This technique helps your child develop a sense of balance and prepares them for pedaling independently.
How to teach your child the push and glide technique
To teach your child the push and glide technique, follow these steps:
- Start by finding a flat, open area where your child can practice safely.
- Have your child straddle the bike with both feet on the ground and their hands on the handlebars.
- Stand behind the bike and gently push your child forward, encouraging them to lift their feet off the ground and coast.
- As your child gains confidence, encourage them to count how long they can coast without putting their feet down.
- Practice this technique regularly, gradually increasing the distance and speed of the push.
Remember to always prioritize safety and provide support and encouragement for your child throughout the learning process.
Safety precautions and common challenges
When teaching your child the push and glide technique, it’s important to prioritize safety. Here are some precautions to keep in mind:
- Ensure your child wears a helmet and other protective gear, such as knee and elbow pads.
- Choose a safe practice area with minimal traffic and smooth surfaces.
- Teach your child to always look ahead and be aware of their surroundings.
- Encourage your child to start with slow speeds and gradually increase as they gain confidence.
- Emphasize the importance of proper balance and body positioning.
Common challenges that your child may face include:
- Fear of losing balance and falling.
- Difficulty coordinating their movements.
- Hesitation to lift their feet off the ground.
- Lack of confidence in their abilities.
Be patient and supportive as your child works through these challenges, providing encouragement and reassurance.
Technique #5: Pedaling with Assistance
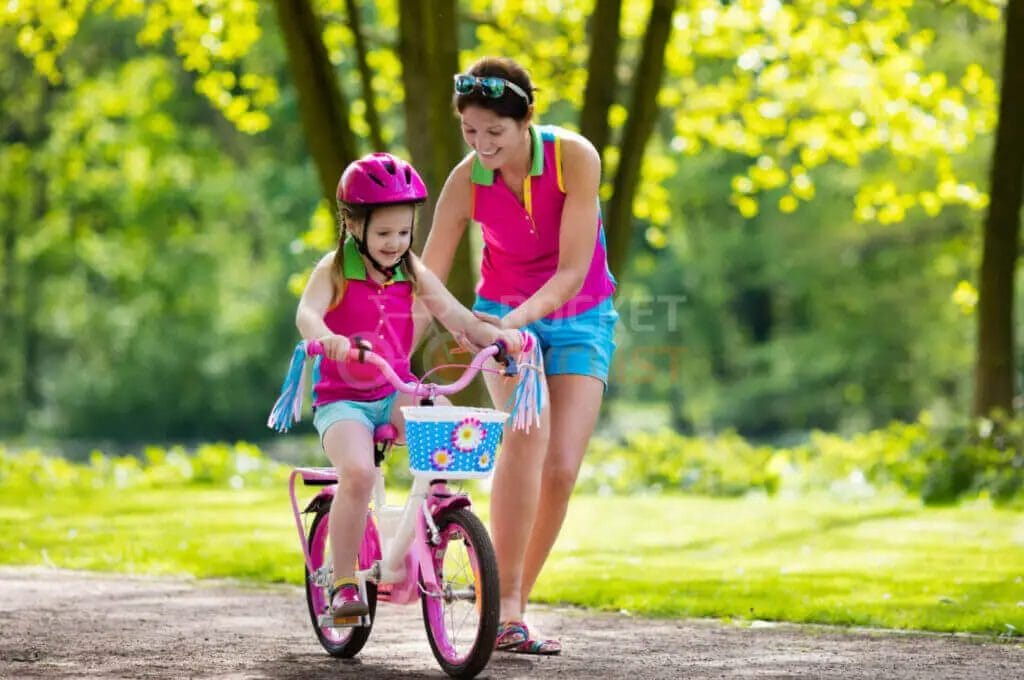
Once your child has mastered the push and glide technique, it’s time to introduce pedaling with assistance. This technique involves a parent or guardian providing support while the child pedals. Start by holding onto the back of the bike seat to help maintain balance. Gradually release your grip as your child gains confidence and coordination. Encourage them to keep pedaling and provide positive reinforcement. This method helps your child transition from gliding to pedaling independently.
Gradually introducing pedaling with the aid of a parent or guardian
To help your child transition from gliding to pedaling independently, you can provide assistance as they pedal. Start by holding onto the back of the bike seat to help them maintain balance. Slowly release your grip as they gain confidence and coordination. Encourage them to keep pedaling and provide positive reinforcement throughout the process. This method allows your child to practice pedaling while still having the support they need to feel secure on the bike.
Building confidence and coordination
Building confidence and coordination is crucial for your child to become an independent bike rider. As they practice pedaling with assistance, gradually reduce your support to encourage them to balance and steer on their own. Celebrate their progress and offer positive reinforcement to boost their confidence. Allow them to practice in different environments and terrains to improve their coordination and adaptability. With time and practice, their confidence and coordination will grow, enabling them to ride a bike independently. Keep encouraging and supporting them throughout the learning process.
Technique #6: Practicing on Different Terrains
When your child has gained confidence riding on smooth surfaces, it’s time to introduce them to different terrains. Start by gradually transitioning from smooth pavements to slightly rougher surfaces like gravel or grass. This will help them develop adaptability and balance while riding. As they progress, encourage them to navigate obstacles such as small bumps or curbs. Practicing on different terrains will improve their overall bike handling skills and make them more confident riders. Remember to provide guidance and support throughout the process.
Transitioning from smooth surfaces to various terrains
Once your child has gained confidence riding on smooth pavements, it’s time to introduce them to different terrains. Start by gradually transitioning to slightly rougher surfaces like gravel or grass. This will help them develop adaptability and balance while riding. As they progress, encourage them to navigate obstacles such as small bumps or curbs. Practicing on different terrains will improve their overall bike handling skills and make them more confident riders. Remember to provide guidance and support throughout the process.
Tips for helping your child navigate different obstacles
- Start with small and gradual obstacles: Begin by introducing your child to small obstacles like small bumps or cracks in the pavement. As they gain confidence, gradually increase the difficulty of the obstacles.
- Teach them to anticipate and adjust: Encourage your child to look ahead and anticipate obstacles. Teach them how to adjust their speed and balance accordingly to smoothly navigate through obstacles.
- Practice balance and control: Help your child develop their balance and control by practicing riding on narrow paths or lines. This will prepare them to tackle obstacles that require precise maneuvering.
- Demonstrate and guide: Show your child how to approach and navigate different obstacles. Demonstrate the correct technique and provide guidance as they try it themselves.
- Encourage problem-solving: Teach your child to problem-solve when faced with obstacles. Encourage them to think critically and figure out the best way to overcome challenges.
- Provide positive reinforcement: Celebrate their efforts and progress. Offer praise and encouragement when they successfully navigate obstacles, and provide constructive feedback to help them improve.
Remember, each child progresses at their own pace. Stay patient, supportive, and provide a safe and positive learning environment to help them build their confidence and skills in navigating different obstacles.
Conclusion
In conclusion, teaching your child to ride a bike without training wheels is a rewarding and empowering experience. By following the techniques outlined in this article, you can help your child develop the necessary balance, coordination, and confidence to ride independently. Remember to be patient, provide a safe practice environment, and celebrate their progress. With practice and perseverance, your child will soon be riding on their own, exploring new adventures and experiencing the joy of biking. Keep encouraging and supporting them throughout their journey!
Summary of the ten proven techniques
Teaching your child to ride a bike without training wheels can be achieved through a variety of techniques. Here is a summary of the ten proven techniques discussed in this article:
- Strider and balance bikes: Start with these bikes to develop balance and coordination.
- Starting with training wheels: Use training wheels as a transitional step.
- The running start method: Begin with a running start to help your child gain momentum.
- Push and glide: Teach your child to push off and glide before pedaling.
- Pedaling with assistance: Support your child while they learn to pedal.
- Practicing on different terrains: Gradually introduce different terrains to improve skills.
- Removing training wheels: Encourage your child to ride without training wheels once they’re ready.
- Providing support: Be a supportive and encouraging presence throughout the learning process.
- Celebrating milestones: Celebrate each achievement to boost your child’s confidence.
- Patience and practice: Remember that learning to ride a bike takes time and practice.
By incorporating these techniques into your teaching approach, you can help your child develop the necessary skills and confidence to ride a bike on their own.
Encouragement and tips for ongoing practice sessions.
Encouragement and tips for ongoing practice sessions:
- Be patient: Learning to ride a bike takes time and practice. Encourage your child to keep trying and remind them that everyone learns at their own pace.
- Celebrate milestones: Acknowledge and celebrate each achievement, no matter how small. This will boost your child’s confidence and motivate them to keep going.
- Set goals: Set small, achievable goals for your child to work towards. This will give them a sense of purpose and progress as they continue practicing.
- Provide support: Continue to be a supportive presence during practice sessions. Offer words of encouragement and provide assistance when needed, such as holding onto the bike seat to help with balance.
- Practice regularly: Consistency is key. Encourage your child to practice regularly, whether it’s a few minutes each day or longer sessions on the weekends.
- Keep it fun: Make learning to ride a bike an enjoyable experience. Incorporate games and challenges into practice sessions to keep things interesting and engaging.
Remember, learning to ride a bike is a journey, and with your support and encouragement, your child will soon be riding on their own.