Last Updated on June 8, 2023 by Vinson Lozano
Are you struggling to reach top speeds on your bike or find yourself spinning out while descending? You may be experiencing an all too common issue amongst cyclists – the front derailleur not shifting to the big ring.
This seemingly small problem can have a significant impact on your overall cycling performance and enjoyment, but fear not! In this blog post, we’ll delve into the nitty-gritty of this pesky problem and provide you with solutions to have you back on track and reaching those high gears in no time.
From understanding the function of limiter screws to ensuring the proper positioning of the front derailleur, we will explore each aspect of this common issue, equipping you with the knowledge you need to troubleshoot and resolve it on your own. So, get ready to embark on a journey into the world of bicycle mechanics, and let’s conquer the dreaded “front derailleur not shifting to the big ring” problem together!
Troubleshooting Front Derailleur: The Basics
Troubleshooting a front derailleur that is not shifting to the big ring involves understanding the basics of the derailleur mechanism and identifying possible issues stemming from improper installation, maintenance, or wear and tear.
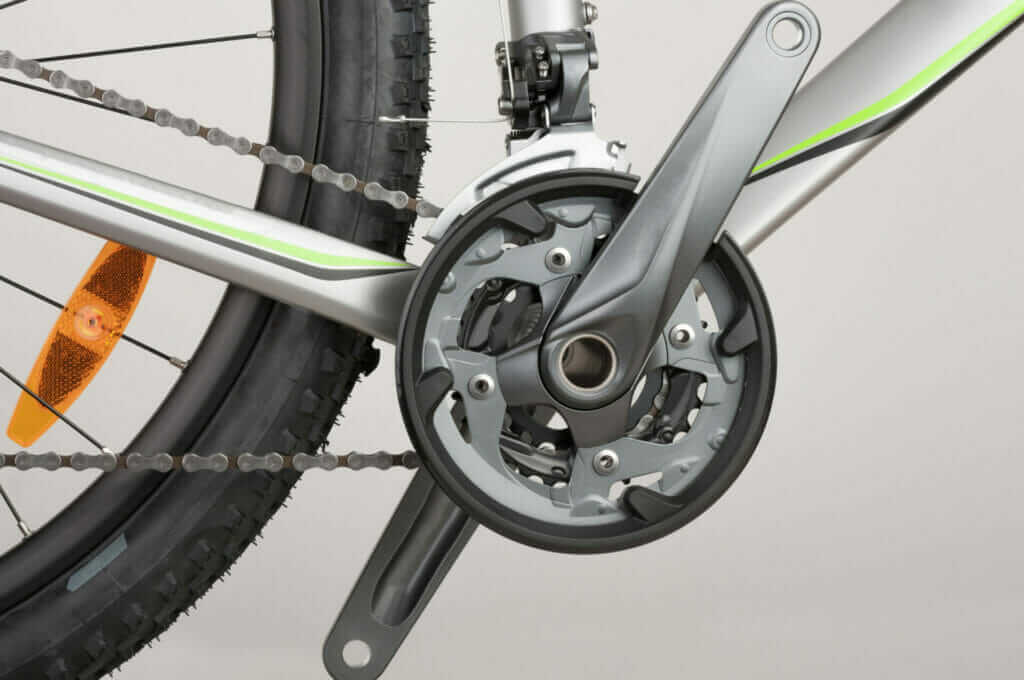
• First, ensure that the front derailleur cage is properly aligned with the chainrings and sits about two millimeters above the teeth of the largest chainring.
• Check the limit screws for correct adjustments, ensuring that the high (H) and low (L) limit screws are enabling the derailleur to function optimally.
• Verify that the cable tension is appropriate for smooth shifting and adjust the barrel adjuster if required.
Negating Limiter Screws for Better Shifting
Negating limiter screws is an essential step for better shifting and ensuring smooth transitions between chainrings. The front derailleur features two limit screws, often labeled with tiny letters “H” and “L,” which represent the high and low limits of the derailleur’s movement. By adjusting these screws, you can prevent the derailleur from moving the chain into a position where there is no cog.
- First, turn the limit screws all the way up to remove any restrictions on the derailleur’s range of movement. This allows for proper shifting to both the smallest and largest chainrings.
- Ensure that the front derailleur is aligned parallel to the chainrings and has a 1-3mm gap between the largest chainring and the derailleur’s cage for correct positioning.
- Testing the shifting after adjusting the limit screws can help identify any further fine-tuning or cable tension adjustments that may be needed.
By properly negating limiter screws and monitoring their effect on the front derailleur’s movement, you can achieve better shifting and overall improved performance of your bicycle’s drivetrain.
Tensioning Front Derailleur Cable
Tensioning the front derailleur cable is a crucial step in ensuring smooth shifting to the big ring. Proper cable tension allows for accurate gear changes and prevents issues such as chain rubbing or dropping. Here are some essential points to consider when tensioning the front derailleur cable:
- Start by shifting the front derailleur to the smallest chainring (lowest gear) to provide the optimal position for cable tension adjustment.
- Use either a cable stretcher or your hand to apply tension to the cable. For the latter, push the derailleur outwards and away from the frame while keeping the cable in place and bolting it securely.
- Keep in mind that cable stretchers provide more accurate and easier tension adjustments, but they can be quite expensive.
“The first thing to do is check if this is the case and how much extra slack is in the cable.” (Bicycles Stack Exchange)
- Adjust the cable tension using the barrel adjuster, which can be found either on the frame or the shifter unit. Rotating it counterclockwise increases the cable tension, providing a finer tuning for better shifting performance.
- Always ensure that the front derailleur cable maintains just enough tension to move the derailleur when the shift lever is engaged. Too tight or too loose tension may result in poor shifting or undue stress on the components.
Fixing Bent Derailleur Bottom Bracket Mount
A bent derailleur bottom bracket mount can also contribute to the front derailleur not shifting to the big ring. This is often a result of improper installation, accidents or natural wear and tear. Fixing a bent derailleur bottom bracket mount is crucial to ensure smooth and accurate shifting. Here are some steps to rectify the issue:
• Inspect the bottom bracket mount for any visible bends or damage. If the bend is significant, it’s best to consult a professional bike mechanic for repair.
• Carefully use adjustable pliers or a derailleur alignment tool to realign the bottom bracket mount. Apply gentle pressure and ensure the parallel alignment with the chainrings.
• Clean and lubricate the derailleur components, including the pivots and bottom bracket mount, to guarantee smooth operation.
• Once the bottom bracket mount is back in position, reinstall and realign the front derailleur to its proper position.
Remember, proper maintenance and periodic inspection of the front derailleur setup can prevent persistent issues and prolong the life of your bike components.
Adjusting the Barrel Adjuster
Adjusting the barrel adjuster is a crucial step in ensuring smooth shifting and proper front derailleur performance. The barrel adjuster is a small component that sits at the end of the cable and allows users to fine-tune the cable tension by turning it clockwise or counterclockwise. In the process of fixing a front derailleur not shifting to the big ring, adjusting the barrel adjuster can provide the necessary tension for accurate shifting.
• Begin by ensuring that the shifter is in the lowest gear position.
• Turn the barrel adjuster counterclockwise to increase the cable tension or clockwise to decrease it.
• Make small adjustments and test the shifting until it functions smoothly and accurately.
As mentioned in the video tutorial, the barrel adjuster should be screwed back into the shifter unit and then turned a single rotation for initial adjustments. Fine-tuning the adjustments can be achieved by incrementally rotating the adjuster until the desired shift smoothness is obtained. Remember, the goal is to have smooth and accurate shifting between gears for a responsive and enjoyable cycling experience.
Proper Front Derailleur Positioning
Ensuring the proper positioning of the front derailleur is crucial for smooth and accurate shifting. Various factors can affect the front derailleur’s performance, so it is essential to follow these steps to achieve proper alignment:
- First and foremost, clean the drivetrain thoroughly to enhance shifting performance. A clean drivetrain ensures that your derailleur components are working efficiently.
- Position the front derailleur on the bike in a manner that the derailleur cage sits correctly in relation to the outer chainring and the chain. This will prevent any poor shifting issues or chain rub.
- Align the lower part of the derailleur cage with the outer chainring, maintaining a 2mm gap above the chainring. This will prevent the cage from connecting with the middle chainring, resulting in a smoother transition between gears.
- Check the alignment of the derailleur cage with the chain: the cage should run in the same direction as the chainrings. This can be done by looking at it from the top or by manually pulling the derailleur cage onto the outer chainring.
In conclusion, proper front derailleur positioning is essential for efficient and accurate gear shifting. By following these guidelines, you can ensure a smooth and enjoyable ride every time.
Using the Barrel Adjuster for Cable Tension
Using the barrel adjuster for cable tension is an important step in resolving issues with the front derailleur not shifting to the big ring. It offers a quick and precise way to make minor modifications to the cable tension, ensuring smooth gear shifts.
- The barrel adjuster is typically located on the shifter unit
- Rotating the adjuster counterclockwise applies a small increase in tension on the cable, while rotating it clockwise decreases the tension
- This method is useful for fine-tuning the shifting performance once the overall system is working properly
Adjusting the barrel adjuster before setting the limiter screws and shifting to the lowest gear is a crucial part of the troubleshooting process. Remember, the barrel adjuster should only be used for minor adjustments and fine-tuning. Proper cable tension is vital for ensuring smooth gear shifts and prevents issues like the front derailleur not shifting to the big ring. By following these steps and incorporating the use of the barrel adjuster, you can achieve a well-functioning front derailleur system.
Cable Stretchers vs. Manual Adjustments
Cable stretchers and manual adjustments are two methods used to fix a front derailleur not shifting to the big ring. Understanding their differences and benefits can help you determine the right method for your bike repairs:
- Cable Stretchers: A cable stretcher is a specialized tool that creates an anchor point for the end of the cable and the housing, pushing them apart to achieve the necessary cable tension. This method is more accurate and easier to use, but it comes with a higher cost, making it less accessible to the average cyclist.
- Manual Adjustments: This method involves using your hands to push the derailleur outwards and away from the frame while keeping the cable in place as you bolt it. Although not as accurate and easy as using a cable stretcher, manual adjustments can yield satisfactory results without the need for expensive tools.
In conclusion, cable stretchers offer a more precise adjustment and easier process but can be cost-prohibitive for many cyclists. Manual adjustments, on the other hand, are more affordable and can still provide effective results for fixing a front derailleur not shifting to the big ring.
Replacing a Partially Torn Shift Cable
A partially torn shift cable can greatly impact the smooth functioning of the front derailleur, resulting in difficulty while shifting gear or even preventing a rider from shifting to the big ring. Timely replacement of a damaged shift cable can greatly enhance your biking experience and save energy during uphill climbs. Here are some key points to consider when replacing a partially torn shift cable:
- Identify the cable issue: A telltale sign of a damaged shift cable is a disproportionate force-to-output ratio, making the shifter feel harder to press than the actual derailleur movement it produces.
- Get the right replacement: Ensure that you purchase the correct cable type for your bike’s derailleur system, either top pull or bottom pull.
- Installation process: With the help of proper tools and following a step-by-step guide or video tutorial, install the new shift cable to your derailleur system. Make sure to adjust the tension correctly for smooth gear shifting.
- Maintain the cable: Regular inspection and timely replacement of cables will not only prolong the life of your bike’s components but also improve overall performance.
In conclusion, replacing a partially torn shift cable can make a world of difference in the functioning of your front derailleur. Prioritize timely maintenance for an optimized biking experience.
The Importance of Proper Cable Routing.
Proper cable routing is crucial for the smooth functioning of the front derailleur, particularly for efficient shifting to the big ring. Ensuring a well-adjusted derailleur setup, free from issues such as bent mounts and inadequate tension on the derailleur cable, can make a significant difference in the performance of your bike’s gear shifting:
- Correct cable routing helps optimize the tensioning and movement of both the housing and the cable itself, promoting seamless gear transitions.
- Proper routing minimizes wear and tear on the chain, cassette, and chainrings by allowing the derailleur to shift smoothly and efficiently.
- It prevents unwanted rattling and noise in the derailleur cage, which can occur at lower or higher gears when the front derailleur does not have enough reach.
In conclusion, the importance of proper cable routing cannot be overstated. It contributes to a smoother, quieter cycling experience while prolonging the lifespan of your bike components. By keeping your bike’s cables and housing in optimal condition and routing them correctly, you can enjoy a better-performing gear system and a safer ride.